
How do I clean vinyl records?
3 May 2020, 20:00 | Updated: 6 May 2021, 21:11


Vinyl records are notorious for attracting dirt, dust and sticky fingerprints. How do you keep your collection in perfect condition and extend its life? We have the essential guide.
As more and more vinyl records - both singles and albums - are sold, it’s more important than ever to keep your collection in good nick. Not only will they play better, but they’ll last longer. Here’s an expert guide to cleaning your records, courtesy of indie store Norman Records in Leeds.
Keeping your records clean on a regular basis
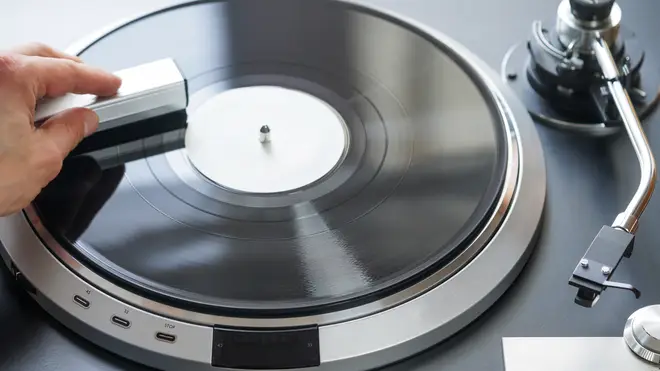
- Get yourself a decent anti-static kit and start making a habit of using it regularly.
- Anti static brushes last for a long time and, unlike vinyl cleaning machines, take up virtually no space in your home.
- The fibres used in the brushes help remove the static that attracts dust in the first place, while at the same time getting right into the vinyl’s grooves to remove it.
- Anti-static mats improve your record’s playback by reducing hiss, but they also help prevent dust reattaching itself to your vinyl as it spins round.
- By placing your record into an anti-static sleeve straight after playing, you'll do yourself a favour next time you come to play it.
- When cleaning your vinyl using an anti-static brush use gentle, long strokes. Work in the direction of the grooves, not across them, and avoid pushing down or applying pressure.
- A decent micro-fibre cloth will help remove everything the brush has dislodged, as well as helping to absorb excess oils from any poor handling, so keep one to hand by your deck.
- A micro-fibre cloth from your local pound store will do the job. But you do get what you pay for, so a purpose-manufactured cloth is worth the extra few quid.
- "Dry cleaning" with an anti-static brush - but without use of any solution - is a good minimum standard to keep your records in decent shape. Keep your brush near your deck, and use it each time you are about to play a record.

Sometimes a quick wipe with the cloth or brush won’t do - here’s how to get into the grooves of your record.
Choose a cleaning solution
Using the wrong kind of solution will damage your vinyl. If you want to chance your arm with your own mixtures and techniques then conduct your experiments on records that you don’t need any more. Alcohol-based solutions can deliver fantastic results initially, but they can also strip the protective coating that sits on the grove wall, and within just a few plays alcohol-damaged records will start to sound harsh.
While they may cost a few pounds more, purpose-designed vinyl-cleaning solutions are worth sticking with. There are plenty of options to choose from.
The step-by-step guide to deep cleaning your vinyl records
1. Remove static and dust
Grab your anti-static brush and micro-fibre cloth and carefully sweep away teh first layer of dirt. Remember: follow the direction of the grooves - don't cut across them.
2. Inspect the record
Once you've got rid of the initial layer of grime you need to know what lies beneath. Good light is your friend, so find a well-lit room and look carefully at the surface of of the record for any fingerprints, greasy patches, smudges, and so on. Rotate the record round to vary the angle of viewing, as you will see more of the dirt and grease in doing so. Problem areas may need several treatments.

3. Spot-clean problem areas
Place your record on a flat, clean, stable and non-abrasive surface to avoid warping or damaging it as you apply pressure. Buy a micro-fibre towel, or a dedicated record cleaning mat, and make sure that your non-abrasive surface can handle your chosen vinyl cleaning solution.
If your solution doesn’t have a spray function then either transfer the liquid into a new receptacle that does (such as a thoroughly cleaned and dry spray gun with a fine nozzle) or dab liquid onto your record with a micro-fibre cleaning cloth. Don’t overdo it.
Once the cleaning solution is on the surface of the record, apply a gentle pressure in circular movements to rub away the blemishes you identified when inspecting the record. Don't scrub across the grooves: concentric arcs, following the direction of the grooves, is the name of the game here.
Take great care to avoid touching the label with liquid of any kind. Loosening the label glue, or simply staining the label, will both ruin it. You can buy record label protector discs to help avoid this problem, but even then you need to be careful that your cleaning solution doesn't leak underneath.
4. Rinse and dry the record
Allow the record to dry in the air. Be careful that no solution seeps away and touches the inner label. If you're short of time - or have used a lot of cleaning solution - use a different, clean micro-fibre cloth to dry your record.
Your record needs to be completely dry before you tuck it away again (especially important if you're using any kind of alcohol-based solution). You do not want to file away a record that is even slightly damp.
5. Store your record safely
In the time it takes between drying your record and tucking it away in its sleeve it will probably have recharged itself and will be busily sucking up dust from the air. So, give it one final light sweep with your anti-static brush and - handling by the edges, obviously - gently ease it back into its anti-static sleeve.